

The Complete Rhythm Trainer Guide
Calibrate once, learn what each of the four drills trains, and turn every gauge in your results into something you can practise on.
1. What the trainer measures
A metronome only plays the beat — it never tells you how you did. The Rhythm Trainer listens back: it measures how far each of your taps lands from the beat, in milliseconds, and shows whether you were early or late.
Good timing is not one skill but several. You might lock onto a click perfectly yet drift the moment it stops, or nail the beats but rush the offbeats. Each drill isolates one of those skills, so your practice goes where it actually helps.
2. The 10-second calibration
Before your first session, run the quick timing setup. Press Calibrate and the tap pad arms itself — nothing starts until you are ready. Your first tap on the pad starts a steady click at an easy tempo.
The first 4 beats are a count-in so you can feel the pulse; they are not measured. Then tap along with the 10 clicked beats — trust your ears, not the screen. When the clicks stop, keep going: the beat continues silently for 4 more beats, and you keep tapping through them. The whole run takes about eleven seconds.
The silent tail is the trick. Taps placed with no click to react to are purely predictive, so comparing the two phases tells the trainer whether you were following the beat or merely reacting to each click.
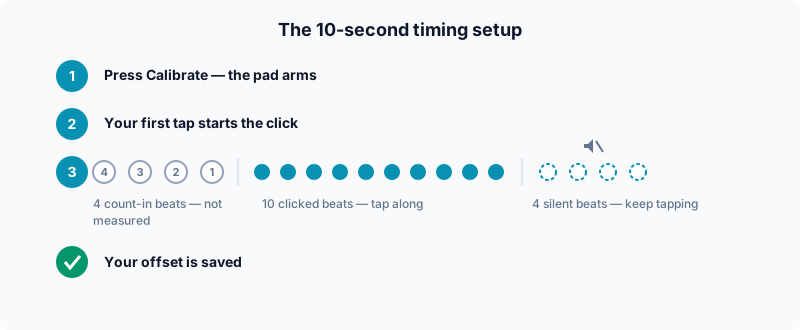
From those taps the trainer takes the median — the middle value, so a single stray tap cannot skew the result — and stores it as your device offset. Beats you miss are simply ignored.
The two phases are also compared: if your taps hugged the clicks but shifted the moment the sound stopped, you were reacting to the clicks rather than following the beat. The trainer then uses your silent-beat taps — the honestly predictive ones — and the confirmation message says so. If the taps were too scattered or too far off, it simply asks you to try again.
3. Why calibration matters
Every device adds its own delay: the sound takes time to reach your ears, and your tap takes time to reach the trainer. Without calibration, the early and late numbers would measure your hardware instead of your playing.
There is a human side too: research on tapping shows people naturally land a few tens of milliseconds ahead of the beat. Calibration measures your personal offset once and subtracts it, so the feedback reflects your actual timing.
4. Session settings: tempo, beats per bar, and length
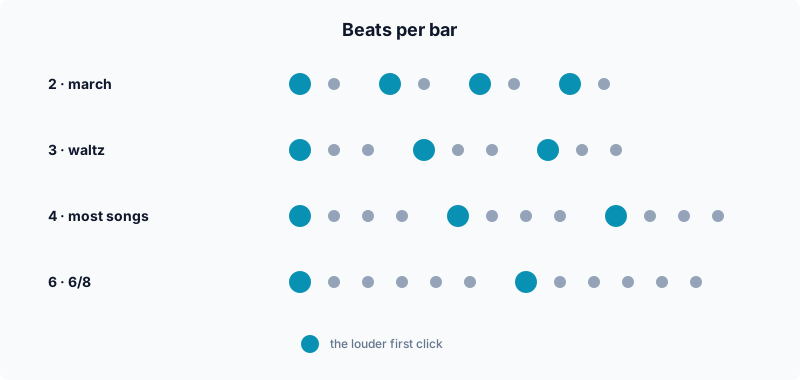
Every drill shares the same basic settings. The tempo runs from 30 to 240 beats per minute — around 120 is a natural, comfortable start. Beats per bar sets how the clicks group: 2 feels like a march, 3 like a waltz, 4 like most songs, and 6 gives a rolling 6/8 feel. The first click of each group sounds louder; you still tap on every click.
Session length presets keep runs short and focused: Short, Standard, and Long set the number of bars or patterns for you, and you can fine-tune the exact numbers under More options.
5. The four drills
Four focused drills each target one skill. Tap the Beat measures how early or late you land on every click. Keep the Pulse drops the click out and tests your inner clock. Subdivisions trains the divisions between beats — eighths, triplets, sixteenths, or a swing feel. Call & Response plays a short rhythm that you tap back by ear.
Tap the Beat — your baseline
The simplest drill and the best place to start: tap on every click. It measures how early or late you land and how consistent you are from tap to tap.
Keep the Pulse — your inner clock
The click plays for a few bars, then drops out — and you keep tapping as if it were still there. This is the drill that builds an internal clock: the thing that keeps you steady when the band stops.
Besides timing and consistency, it reports drift — whether you gradually speed up or slow down through the silence — and estimates how much of your unsteadiness comes from your internal clock versus your hands.
Subdivisions — between the beats
Here you tap the divisions between beats: eighths split each beat in two, triplets in three, sixteenths in four. The swing option makes each pair long-short instead of even.
Real swing is not one fixed ratio: it loosens from about 3:1 at slow tempos toward 1:1 as the tempo rises, and the drill follows that curve.
Call & Response — playing by ear
Listen to a short rhythm, then tap it back. The drill scores two things separately: accuracy — how many notes you caught, missed, or added — and timing, how precisely the notes you did catch were placed.
Higher difficulty adds more notes, offbeats, and syncopation to the patterns you copy.
6. Your first session
Press Start. A one-bar count-in gets you ready, then tap the pad — or the space bar — in time with the click.
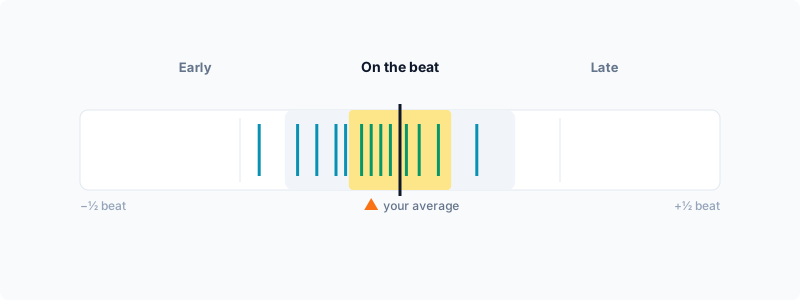
While you play, the timing map fills in: each mark is one tap, left of the centre line is early, right is late, and the ▲ shows your average. When the session ends, the coach sums up your run in plain words before any numbers.
7. Reading your results
The coach's verdict
Every session ends with a plain-language verdict before any numbers: locked in, steady but a touch early, speeding up, or time to slow the tempo down.
It reads steadiness first and bias second. A scattered run gets advice about relaxing and slowing down; a steady-but-early run is told exactly how many milliseconds ahead it sits — and what to do about it.
Timing and consistency — the two that matter
Timing is your average distance from the beat, shown in milliseconds and as a percentage of a beat. Consistency is the spread of your taps — how repeatable you are from tap to tap. Steadiness often matters more than being dead-on.
Both gauges use the same beat-relative scale as the map: the far end is half a beat, as far from the beat as a tap can possibly be, so the scale adapts to your tempo.
The verdicts compare your milliseconds against fixed bands: Tight means within about 20 ms of the beat — around the limit of what listeners can even tell apart — and Good within about 45 ms. The gauge behind the verdict shows where that sits inside your current beat.
Direction versus drift
Direction is your average bias: rushing (early) or dragging (late). A small early lead is natural — research on tapping shows people typically land a few tens of milliseconds ahead of the beat — so the trainer only flags rushing once you drift well past that healthy range.
Drift is change over time. Your taps can be perfectly centred on average yet slide later and later: that reads as slowing down, measured in milliseconds per beat. In Keep the Pulse, a clock-versus-hands estimate also splits your unsteadiness between your internal clock and your motor response.
The hit-error map
The hit-error map is the whole story in one picture: each mark is one tap, measured against your own steady rhythm — left of the middle is early, right is late, and a tight cluster in the middle zone means you are consistent. The bold line is the beat itself, with the ▲ pointing at it: the further they sit from the middle, the more your whole rhythm leans early or late.
8. The Flow game — an endless run
Beyond the four drills sits Flow: an endless run with nothing to configure. Shapes stream toward a hit line, the difficulty adapts to hold you near 85% success, and seven timing skills are trained exactly where your playing says it helps.
Flow has its own complete guide — starting with the one rule that matters most: when to tap, and when not to.
Sources & References
- Repp (2005) — Sensorimotor synchronization: A review of the tapping literature
- Dalla Bella et al. (2017) — BAASTA: Battery for the Assessment of Auditory Sensorimotor and Timing Abilities
- Wing & Kristofferson (1973) — Response delays and the timing of discrete motor responses
- Friberg & Sundström (2002) — Swing ratios and ensemble timing in jazz performance
Ready to find your timing?
Everything runs in your browser — no account, no uploads. Calibrate once and see where your timing really stands.
Open the Rhythm Trainer